Sunday, July 10, 2011
Jewels for Evan
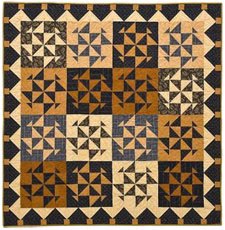
Here's a picture of the quilt I made for Evan. His Mom - and Grandma (oh, that's me!) like purple, so it was great to work with such fun jewel tones.
Baby Love
There's a new man in my life and I've fallen head over heels in love with him. He lives in another town and when I'm home I spend my time thinking about when I'll see him again.
Welcome to the family Evan Matthew! Born June 30, 2011, 6:22 am. 7 lbs, 5 ozs, 20.5" long.
Sunday, June 05, 2011
Watch Cap
This is probably looking less and less like a quilting blog these days. I want you to know I *am* quilting but I'm working on gifts and will show them later. In the meantime I find knitting to be so calming. Have you heard the saying, "Knitting calms the troubled soul, and it doesn't hurt the un-troubled soul either"?
So after those earlier failed projects, I decided to make a Watch Cap using remnant yarn. Since the yarn was bought at the Senior Center Thrift store, I only knew it's a wool/mohair blend, no other product information. But I loved the color! Electric blue. I searched knitting sites for information on what needle size would be best for this yarn. I found a site that talked about wraps per inch and suggested needle sizes based on wpi. Cool, this is what I need! .
Like the purple scarf, I got part way along and found I didn't have enough yarn. But this project could be 'pieced' together, so I knit with another color to make up the difference. I also made an effort to custom fit the cap, rather than following the pattern exactly. I frogged a couple of times but love how it turned out. And it feels great, snug and cozy.
I finally realized that I've been trying to learn without spending a lot on yarn or materials, because I'm afraid to invest in a project that might not turn out. But I definitely want to knit with natural fibers. It would really reduce my frustration if I would just decide my time is worth the price of yarn from the LYS and stop this piecemeal approach. More successes will boast my confidence.
Yarn Lessons
Back in March I was so jazzed about knitting a sweater from yarn I reclaimed from a thrift store sweater. Once I frogged it back I had a pile of yarn to work from! But the more I knitted, the more I found thin spots in the yarn that needed to be removed and then spliced back together. I'd been excited to find out I was working with home spun yarn, but now I had my doubts! I couldn't knit a single row without having to stop and splice, slow going. And truth be told, it was scratchy; did I want this against my skin?
I had a long conversation with a knitting friend and she agreed it wasn't worth the effort. I 86'ed it.
Undaunted, I bought other remnant wool from a thrift store and cast on for a Feather and Fan lace scarf.
Loved the color! Loved the pattern! But it quickly became clear I didn't have enough yarn. I frogged the scarf and searched the online knitting sites for help. I found a chart that gives suggested yardage by project. What a great tool!
I just keep trying. I've been a quilter for over 28 years and an active knitter for three. I know how to adapt a quilt pattern to my fabric stash or draft an original design. But I don't know how to adapt knitting patterns. It's becoming clear to me that I need to get a good book of knitting patterns and *follow the instructions* as written. I shouldn't branch out until I understand the basics better. But it's hard, I'm so used to adapting something to make it my own.
I had a long conversation with a knitting friend and she agreed it wasn't worth the effort. I 86'ed it.
Undaunted, I bought other remnant wool from a thrift store and cast on for a Feather and Fan lace scarf.
Loved the color! Loved the pattern! But it quickly became clear I didn't have enough yarn. I frogged the scarf and searched the online knitting sites for help. I found a chart that gives suggested yardage by project. What a great tool!
I just keep trying. I've been a quilter for over 28 years and an active knitter for three. I know how to adapt a quilt pattern to my fabric stash or draft an original design. But I don't know how to adapt knitting patterns. It's becoming clear to me that I need to get a good book of knitting patterns and *follow the instructions* as written. I shouldn't branch out until I understand the basics better. But it's hard, I'm so used to adapting something to make it my own.
Vintage Afghan
I found this at the annual church yard sale in among half a dozen other afghans made from Wintuk acrylic. This one is wool in a beautiful natural color. It's so charming, it caught my eye.
I was pleased to find a note attached that said it had been made in 1915. (!) It was in near perfect condition. Such a bargin for 50 cents. I took it home, gently soaked it in the bathtub and once dry, mended a few spots with tapestry wool.
I have a half a dozen quilts on a rack next to my recliner, but this has become my new favorite for pulling across my knees when I'm cold. The note also said it was one of four made. I think about the woman who made them and what became of the others.
I was pleased to find a note attached that said it had been made in 1915. (!) It was in near perfect condition. Such a bargin for 50 cents. I took it home, gently soaked it in the bathtub and once dry, mended a few spots with tapestry wool.
I have a half a dozen quilts on a rack next to my recliner, but this has become my new favorite for pulling across my knees when I'm cold. The note also said it was one of four made. I think about the woman who made them and what became of the others.
Sunday, May 08, 2011
Knitted Kitchen Scrubbies
I've been alternating my intense piece-work with mindless knitting.
Take one ball of cotton yarn, Sugar 'n' Cream works well
One leftover plastic produce bag like the kind oranges come in
and a pair of size 10 knitting needles.
These take about a half an hour each and that includes cutting the plastic into strips and tying the ends together to make 'plarn', plastic yarn. I made four as samples for the ladies at work that were going to help demonstrate ways to reduce and reuse plastic bags by making plarn and knitting or crocheting with it. This is my own pattern but there are lots of ideas for creating with recycled plastic at My Recycled Bags.com. Thank you Cindy!
Take one ball of cotton yarn, Sugar 'n' Cream works well
One leftover plastic produce bag like the kind oranges come in
and a pair of size 10 knitting needles.
These take about a half an hour each and that includes cutting the plastic into strips and tying the ends together to make 'plarn', plastic yarn. I made four as samples for the ladies at work that were going to help demonstrate ways to reduce and reuse plastic bags by making plarn and knitting or crocheting with it. This is my own pattern but there are lots of ideas for creating with recycled plastic at My Recycled Bags.com. Thank you Cindy!
Go With What You Know
It's important to listen to the fabrics when they try to tell you what works well together and what doesn't. I've pulled fabrics from my stash for this quilt three different times, grouping and regrouping; which way do I really want to go? If I don't know where I'm going, it's really unlikely I'll get there.
So I went back to my Dating Fabric book and decided - to heck with the current interest in reproducing Civil War quilts. I don't actually LIKE the fabrics or the combinations; so why put myself through this? I decided to move the palette to the Turn of the Last Century, 1890-1910. Now I feel like I know what I'm doing!
I also decided it would be worth while to really lay out each block in Electric Quilt so I could see what it looked like before spending the time piecing! A few hours scanning the actually fabrics I wanted to use and laying out the block in EQ was much less time consuming then weeks of cutting and piecing.
So I went back to my Dating Fabric book and decided - to heck with the current interest in reproducing Civil War quilts. I don't actually LIKE the fabrics or the combinations; so why put myself through this? I decided to move the palette to the Turn of the Last Century, 1890-1910. Now I feel like I know what I'm doing!
I also decided it would be worth while to really lay out each block in Electric Quilt so I could see what it looked like before spending the time piecing! A few hours scanning the actually fabrics I wanted to use and laying out the block in EQ was much less time consuming then weeks of cutting and piecing.
Lone Star Color Choices
I've been plunking along on the Lone Star blocks. After the quilt retreat in March I finished the blue variegated star and felt really good. I selected colors for the next block and dove in. Each block is 20" so I sorta feel like I'm making blocks big enough for a wall hanging, I feel like I'm making 20, 20" quilts!
These fabrics were chosen to be more like the circa 1860 fabric palette I think I'm working with. I didn't feel real confident about the combination, but cut and pieced anyway, figuring the color scheme would emerge as I went along. I liked the burnt orange, navy and red, but the brown and poison green were a challenge to use.


These fabrics were chosen to be more like the circa 1860 fabric palette I think I'm working with. I didn't feel real confident about the combination, but cut and pieced anyway, figuring the color scheme would emerge as I went along. I liked the burnt orange, navy and red, but the brown and poison green were a challenge to use.


With this method of making a Lone Star you have to do a lot of piecing before you see what the first arm of the star's going to look like it. Meh - but still I pieced.

At this point I could now see the flow of colors around the star and where the drop outs were. I made myself continue to piece arms, hoping it would grow on me. When the kids came up for the weekend, they looked at it and gave their perspective. None of us liked the brown, it was muddy, dropped out and made the colors on either side of it look crummy. We had a long conversation about what works in the other stars and where I wanted to go from here. Nathan summed it up, "I understand you want to challenge yourself to work in a color palette that's unfamiliar to you, but do you want a quilt when you're done, or another UFO?" Frank said, "I hate to see you work so hard at it and not enjoy the outcome. You'll probably only make this quilt once, wouldn't you rather love it when you're done?"
Yes. I packed these pieces away. Lesson learned, go with your gut.
More About Yarn
Then I took it to the LYS and learned to use the umbrella swift and ball winder. That was fun, something new! I made a couple of comments about how very right handed the swift and ball winder set-up were, but the right-handed shop clerks just looked at me. They asked me if I'd spun it myself, "No, do you think it's hand spun?" They each looked at it and agreed it didn't look like a commercially produced yarn, there's too much variation in the strand. That was fun information.

I've knit about three inches in the sweater pattern, stopping occasionally to remove an especially thin length of the yarn and splice it together again. It slows the knitting down, but I think I have more than enough for this pullover, so it feels okay to do that.
Note: I was going happily along until I went to the LYS's knit night and saw all the wonderful, *soft*, cashmerino type sweaters that were being shared during show and tell. The handspun feels very wooly and not particularly soft. Right now I don't feel like continuing. :( I'll have to sit with it and see how I feel.
Local Color
One day in early April, Frank went out to call the cats in for the day. We have neighborhood dogs that aren't always leashed, so we do what we can to keep Lila and Spunky safe. This is what he found in our back pen near the compost.
Stained Glass Sweatshirt
This workshop was in March and is a pattern one of the guild ladies created. If you're in the Ladies of the Lake quilt guild long enough, you'll eventually make one of these it seems. They're easy and fun but look so elegant.


The instructions tell you to find the center of a cotton sweatshirt, cut it open, reinforce the fabric to reduce stretch and then sew a strip of cotton dress weight fabric ten inches wide to the outside. Then you turn it to the inside like a facing.
When you cut out the shapes, leaving a little fabric around each quilt line, you have a stained glass look design on the front of your sweatshirt.

The variety of colors and combinations is wonderful!

Monday, April 04, 2011
Getting Ready
I have a box of baby clothes in storage that used to be my sons. I've been hoping one day to share them with a grand baby. That day will soon be here.
Rayon Batik Jacket
I promised pictures of the jacket I made while at retreat this year.
It's called Swing Fever.
I love the way it feels, it does *swing*. And the batik is almost the same on both sides so it worked well with the rolled shawl collar. I'd like to say it was easy to make, but the instructions forgot to tell you to cut out the collar. Then they forgot to tell you to attach the collar so I pretty much had to wing it. Maybe I should call it my Wing It jacket. ;)
It's called Swing Fever.
I love the way it feels, it does *swing*. And the batik is almost the same on both sides so it worked well with the rolled shawl collar. I'd like to say it was easy to make, but the instructions forgot to tell you to cut out the collar. Then they forgot to tell you to attach the collar so I pretty much had to wing it. Maybe I should call it my Wing It jacket. ;)
Saturday, April 02, 2011
Tee Shirt Art Submission
The natural foods co-op where I work recently had a tee shirt art contest. I found a source picture of a child holding a seedling, being held also by her Mom and got inspired. Here are some of my steps in the process.
First I sketched it with pencil.
Then I colored it with Berols and scanned it into the computer.
My son digitally colored it.
Once I had my image, I added text. My submission didn't win - I placed second, but I had a lot of fun with it. I hadn't done anything with my drawing in a long time.
First I sketched it with pencil.
Then I colored it with Berols and scanned it into the computer.
My son digitally colored it.
Once I had my image, I added text. My submission didn't win - I placed second, but I had a lot of fun with it. I hadn't done anything with my drawing in a long time.
Black Licorice and Jelly Beans Quilt
This just came back from the long arm quilter. I end up calling it Black Licorice for short.
I loved the bright colors so much I pieced them into the back too. That helps bust stash!
Marian's terrific quilting shows really nicely on the back. Once the binding's on it's going to hang in the hallway.
I thought the name for this quilt, which my friend Rosy suggested, was so cute and original. I was pretty surprised recently when I opened the guild newsletter and saw this quilt by Joe Wood, entitled Black Licorice and Butterscotch.
Monday, March 28, 2011
Can't Win 'em All
I found a chunk of cotton homespun on the freebee table at guild and thought it would work for faux chenille scarves. Maybe I could get a jump on this year's Christmas gifts. :)
This time I used Clover's slash cutter, wowee zow! That made a huge difference. Last time I cut the channels with embroidery scissors and it took days instead of half an hour.
It didn't really turn out, it's not fluffy or soft like the ones made from flannel. Live and learn.
This time I used Clover's slash cutter, wowee zow! That made a huge difference. Last time I cut the channels with embroidery scissors and it took days instead of half an hour.
It didn't really turn out, it's not fluffy or soft like the ones made from flannel. Live and learn.
Subscribe to:
Posts (Atom)