Thursday, January 19, 2012

Soft Memory Cards

Did you ever play the Memory game, using a standard deck of 52 playing cards? Any number of people can play. You place all cards, face down on the table. Each person turns over two cards, one at a time and leaves them in their place. If they don't match, they are turned face down again. If they do match, the person gets another turn. The one with the most matched pairs at the end of the game wins.

I saw the idea for fabric memory cards at Purl bee. If you want to make these, please read those instructions. I changed the directions a little to make them easier.


You will need 42 - 2-1/2" squares, two each of cotton fabric, medium weight fusible interfacing, 8 ecru felt squares 9" x 12", a small amount of clear template plastic, a black permanent marking pen, a craft knife, a sewing machine, ecru thread to match the felt and rotary cutting mat, cutter and rulers.  

I chose 21 fabrics for a set of 42 memory cards, but you could make more or less if you want. Cut the squares 2-1/2". I went to my scrap box of 2-1/2" squares and pulled pairs.


Instead of cutting squares of the fusible interfacing and fusing them to the fabric squares one at a time, I placed the squares on a sheet of interfacing and used a pressing sheet to keep the bottom of my iron clean, fused all 42 squares at once.


Cut the squares apart using your rotary cutter and ruler.


Yes, these instructions are left-handed :)

For both the front and back felt squares, you'll need 42 cut 3". Cut 21 from the felt, these will be for the fronts, set aside. Before you cut 21 for the backing squares, fuse the 9" x 12" felt pieces to the interfacing, then cut 21 squares for the backs.


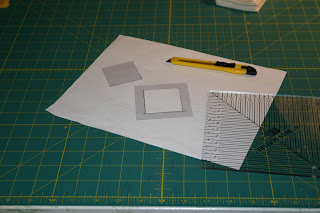
Next make a 3" keyhole template from the clear plastic. Mark the inner square with a fine tipped Sharpie or other permanent marker, 1/2" in from the edge, making a 2" square. Carefully cut this out with a sharp craft knife.


Place the template on a 3" felt square that does not have interfacing on it and mark the corners with a pen. I tried pencil, it didn't show. I also tried a water soluble marker and it spread out too much on the felt.


When you cut out the center, cut on the outside of the pen marks. This is the wrong side and will be face down when you assemble your squares.


To sew them together, place a fabric square right side up on the wrong side of a backing square. The backing squares have the interfacing on them. Lay a top piece over and pin at the top.


Adjust your stitch length to allow for sewing through two layers of felt. On my Janome MC, that was 3.3, instead of the usual 2.3 I use for patchwork. Sew a quarter of an inch around the outside of the square first, pivoting at the corners and taking a back stitch at the end. Cut the thread, lift the presser foot and move the square over to the edge of the opening. Top stitch a scant 1/8" in from the edge around the opening, pivoting at corners and back stitching at the end. Remove from the machine and trim threads close to the front and back. I found the Janome  thread cutter made this part of the project go fast.


Using your rotary cutter and ruler, trim the squares a scant 1/8" on all sides, squaring them up. Now you're ready to lay them out.


This is a great game to play with your kids or grandkids. It's also great for anyone working to sharpen their memory and visual-spatial skills. Try it, just for fun!

The Not-so Felted Slipper


I put the slipper in a zipped pillow case to catch the lint and washed it FIVE times in hot water, with a little bit of detergent and the wash cycle set on heavy-duty. I checked it after each cycle.


Here's about half of the lint. It's better to catch it somehow than to let it clog the washer's drain pipe.


It shrank and felted but as you can see, not nearly enough to make a size 8; or even a size 13! I'm willing to explore and experiment if I learn something along the way; in this project I got better at the Kitchener stitch used to seam the bottom. And I learned if I'm going to veer from an established pattern, I can expect mixed results. More swatch testing was probably in order for this project. So I guess it's back to the drawing board.

Wednesday, January 18, 2012

Someone Has a Sense of Humor


Another Virginia Cowl

Once I finished the Virginia cowl for my Mom's gift, I began one for myself using the reclaimed merino. 

It seemed too tight on size 8 needles, so I changed to size 9. But when I blocked it, it grew an inch in width. I think that's because the reclaimed wool relaxed. This is a good lesson for me, always prewash your reclaimed skeins to get the kinks out!


It's soft and fun, but cashmere is definitely snuggier than merino. :)

Friday, January 13, 2012

Thursday, January 12, 2012

Felted Clutch Ball

Last fall, during all the fiber exploration and experimentation I was doing I got interested in felting too. I wanted to make a clutch toy for my grandson from a pattern I saw in a book. But the pattern was vague and incomplete. I followed it the best I could using trial and error, lots of error. 

Working with little bits of different colored yarn I knit a shape that looked like this. 
Since I didn't have six different remnants of colored yarn, I bought natural wool and Kool-aid dyed small hanks. I wanted blue for the sixth side but after trying six stores in town I settled for repeating a color. I guess blue raspberry Kool-aid isn't that popular.

I got it most of the way knitted, using the recommended 40 stitches but it was turning out really big, even for something that was going to be felted. So I decided to do a pattern search on Ravelry. There weren't a lot of people that had made it, but their notes were very helpful. One said it didn't shrink that much and was the size of a basketball. She was using hers as a back rest. That's not what I'd envisioned! I wanted a small, child-sized ball. So I frogged what I had and reduced the number of stitches by half - 20.


Once it was knit, I sewed it together into a cube, stuff it with wool and a jingle bell and sew it closed. I placed it in a zippered pillow case and washed it in hot, hot water, using the heavy agitation cycle. The pillow case catches the fiber that sheds and helps save your washing machine from clogs and burn out.


It was still bigger than I wanted. I decided to make it again and reduce the number of stitches to 10. In the meantime I'd found some blue Kool-aid and had my sixth color.


Ta-da, I love it!

And according to the pictures Christmas morning, so does Evan.

Greetings From Planet Yip Yip

My sons are in their late 20's and early 30's but they still get a kick out of the Yip Yip aliens from Sesame Street. YouTube has a whole library of their skits. The one where they meet the clock is a favorite of mine. So when I saw this pattern on Ravelry I just had to try it!


I had some fingering yarn left from socks that was perfect. And crocheting the tentacles was fun. Because this one's on the small side, I used white DMC floss to wrap the straw that makes the eyes, then embroidered the iris with black floss.

DS2 opened it Christmas morning and hadn't had it two minutes before his fiance' asked if she could see it. Yip, yip, yip, yip. :)

It was a little tricky using the small dpns on the first one so I used dk yarn for the next one.


Every programmer, computer geek has his executive toys; my sons have these on their desk.

Knit Wear

Now that Christmas has come and gone I can show you what I've been working on. I knit my way through September, October, November and December. It was great! Read books on the subject, trolled Ravelry, learned a lot of new skills and techniques, found left-handed knitting tutorials on YouTube. I was as happy as a clam.

You might remember this watch cap made last year. I got the idea to make it again and use self striping yarn for the center band. Crofters DK is perfect for this. Most of the patterns on the site use the yarn for the entire garment, but I paired it with cream to enhance the Fair Isle effect.


It looks so much more complicated than it really is. I love the way it turned out. I made one for my DIL and then had to make one for me! The pattern is available as a free download on Ravelry.

P.S. I changed my font because the new blog editor makes 'normal' sized font appear too small. A new look for the new year. ;)

Saturday, January 07, 2012

Felted Slippers


I got this Men's tall lamb's wool sweater at a thrift sale for less than a dollar. It's sooo soft, I've been enjoying reclaiming the yarn. I frog the yarn, skein it to a niddy noddy, hand wash it to get the kinks to relax and when I'm ready to knit with it, wrap it into balls.


I finally invested in a yarn winder and can make my own center-pull yarn 'cakes' now. This is the U-Nitt metal jumbo winder. It has metal gears and can wind up to 9 ozs. It's a gas to use. 

I tried using the Boye electric ball winder but it just didn't do the job, the least amount of tension on the yarn and it bogged down. I returned it to Michael's.


So I started a pair of slippers using this pattern on Ravelry. I've changed it a bit to allow me to work with three strands held together on size 13 needles. I knit and felted swatches using two strands on size 10 and three on 13 and liked the thickness of three better; but it's all an experiment. I'll let you know if it turns out.