I saw the idea for fabric memory cards at Purl bee. If you want to make these, please read those instructions. I changed the directions a little to make them easier.
You will
need 42 - 2-1/2" squares, two each of cotton fabric, medium weight fusible
interfacing, 8 ecru felt squares 9" x 12", a small amount of clear template plastic, a black permanent marking pen, a craft knife, a sewing machine, ecru thread
to match the felt and rotary cutting mat, cutter and rulers.
I chose 21 fabrics for a set of 42 memory cards, but you could make more or less if you want. Cut the squares 2-1/2". I went to my scrap box of 2-1/2" squares and pulled pairs.
Instead of cutting squares of the fusible interfacing and fusing them to the fabric squares one at a time, I placed the squares on a sheet of interfacing and used a pressing sheet to keep the bottom of my iron clean, fused all 42 squares at once.
Cut the squares apart using your rotary cutter and ruler.
 |
| Yes, these instructions are left-handed :) |
For both the front and back felt squares, you'll need 42 cut 3". Cut 21 from the felt, these will be for the fronts, set aside. Before you cut 21 for the backing squares, fuse the 9" x 12" felt pieces to the interfacing, then cut 21 squares for the backs.
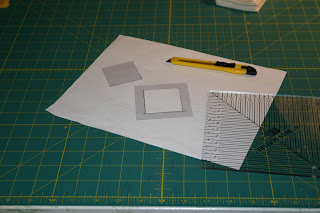
Next make a 3" keyhole template from the clear plastic. Mark the inner square with a fine tipped Sharpie or other permanent marker, 1/2" in from the edge, making a 2" square. Carefully cut this out with a sharp craft knife.
Place the template on a 3" felt square that does not have interfacing on it and mark the corners with a pen. I tried pencil, it didn't show. I also tried a water soluble marker and it spread out too much on the felt.
When you cut out the center, cut on the outside of the pen marks. This is the wrong side and will be face down when you assemble your squares.
To sew them together, place a fabric square right side up on the wrong side of a backing square. The backing squares have the interfacing on them. Lay a top piece over and pin at the top.
Adjust your stitch length to allow for sewing through two layers of felt. On my Janome MC, that was 3.3, instead of the usual 2.3 I use for patchwork. Sew a quarter of an inch around the outside of the square first, pivoting at the corners and taking a back stitch at the end. Cut the thread, lift the presser foot and move the square over to the edge of the opening. Top stitch a scant 1/8" in from the edge around the opening, pivoting at corners and back stitching at the end. Remove from the machine and trim threads close to the front and back. I found the Janome thread cutter made this part of the project go fast.
Using your rotary cutter and ruler, trim the squares a scant 1/8" on all sides, squaring them up. Now you're ready to lay them out.

This is a great game to play with your kids or grandkids. It's also great for anyone working to sharpen their memory and visual-spatial skills. Try it, just for fun!


2 comments:
Boy, these look like a lot of fun... I just may try it some day. Good job, Leslie...
I should get ready for that day when the memorie starts fading!! Really neat!
Post a Comment