Sunday, March 31, 2013


Tuesday, March 26, 2013

Sunday, March 24, 2013
In My Yard


Spunky's in the cedar tree - about nine feet above the ground.


It seems like I plant daffodil bulbs every two years. This time when I planted I lined the hole with wire mesh to slow down the gophers. Ones and twos have bloomed again this year. I see this site up and down the road in my neighborhood. Maybe one day it'll be in my yard. I just keep trying.

Tuesday, March 12, 2013
Radiant Nine Patch Layout
Once I finished piecing the nine patch blocks I moved to the floor to lay it out. What I had on the design wall was short and fat, I needed to shift the light center in and down.


I tried to build out and around, but I got to my width sooner than the deep-dark blocks, so I changed the layout again, trying to make it longer.

The nine patches are 'X' and 'O' blocks with the seams pressed out and in respectively. As I laid out the blocks I had to alternate X and O in addition to color placement. I spent time positioning and repositioning the blocks. And being the multi-fabric quilter that I am... I don't like too many of the same fabrics close together; resulting in more positioning and repositioning...

It quickly became clear to me that the deep reds weren't going to work, too much *pop*. So I eliminated all but a few for sparkle. It might not look like it, but the final layout took four hours.

I stacked it sequentially in rows preparing to 'web the top' when I sewed it together. When I carried the board with all the stacks on it into the sewing room, I bumped the corner of the sewing table and the whole thing fell... I closed the door on it until tomorrow.
That was last week. I have laid it out again and it took another four hours, but I'm happy with it and look forward to sewing it together. For now, the cat is not allowed in the sewing room. I don't want to invite another disaster.
Tuesday, March 05, 2013
Stuffed Owl

Just a quick little project sewn in between all the nine patches for my son's quilt. I followed these instructions. This one is made from upcycled wool from an old Pendleton shirt that became too small for anyone in this house to wear. My husband has taken a liking to it and named him Arthur. He said, "I like it in wool. He looks very dignified." :D
Radiant Nine Patch Redux
I've been working on a Radiant Nine Patch quilt for my son. It's not often that I make the same quilt twice, but this was his favorite childhood quilt.


Twenty years ago... interestingly enough, I still have many of the fabrics used in the original. I'm using my favorite speed piecing method to create the nine patch blocks; with a slight variation. For this quilt I need 'x' and 'o' blocks. I pair the A-B-A and the B-A-B units right sides together and cut apart in strips. Three cuts make one 'x' and one 'o' block each.


Some of the fabrics are remnants that need to be traditionally pieced because there isn't enough for the speed piecing method. I still want these fabrics in the quilt though.


This quilt gets its visual movement from the over-all layout. It's best to make low contrast nine patch blocks, something that looks odd at the block stage but not on the design wall.
 |
| January 20 |
 |
| January 30 |
 |
| February 5 |
 |
| February 12 |

I'm still making nine patches but I've run out of design wall. I need 306, I have 275. I completed the dark-darks yesterday and will start on the deep-darks next. I love the way it sparkles.
When I made this quilt the first time I didn't have a very big fabric collection. Now I have so much to choose from; I'm having fun mixing in new fabrics with the original fabrics. And I wasn't as seasoned a quilter then as I am now. It seemed like an *amazing* amount of sewing! When it was done I announced I would never make another one. So when I offered to redux my son's quilt he gently reminded me of what I'd said. Well... he's over six feet tall, he needs a bigger quilt. I'm happy to gift him in this way. And I'm having a blast (from the past) spending time with these fabrics. Quilt love...
Thursday, February 28, 2013
Flying Geese Methods
I got a new ruler that claims to take the math out of making Flying Geese. I decided to do a test sew using it and the Eleanor Burns Quilt in a Day method, to see which one I liked best.


.jpg)
.jpg)


This method was very intuitive. I could find the size I wanted on the ruler and there wasn't a lot of thinking involved; it's true, no math! Trimming up was easy left or right handed and there was practically no waste. ~ On to the other method. Sorry there are fewer pictures, I had to concentrate more and forgot.

.jpg)


This method was totally non-intuitive for me. Which square is going to become the background, which one the geese? The steps are not as familiar and trimming up was really tricky left handed. No instructions were given for left handed trimming, though that's not uncommon; and there was a lot more waste in the trimming. The instructions give you one size. There's a Quilt in a Day ruler for this method but it only includes two sizes. Both methods produce four Flying Geese. I suppose with practice the second method would become easier and therefore go faster, but I really liked the No Math Ruler method. It's created by Lazy Girl Design. Love the name!
In the past I've usually just made half-square triangles and sewn them together to make a Flying Geese (goose?) but now I have an easier way!
Thursday, January 31, 2013
Double Nine Patch For Tom
Last November my brother-in-law fell 12 feet from the barn roof where he was patching a leak. Even though he broke 11 of 12 ribs on one side, punctured his lung, broke his left arm clean through and his pelvis in two places, he's going to be okay. After a week in ICU and several surgeries, he was eventually moved to a rehab hospital. He's been there since Christmas. This weekend he comes home!
During our second visit with him in the hospital, I watched him try to get comfortable in the bed. It was a cold, foggy day. He had the usual cotton, open-in-the-back hospital gown on and the woven cotton blanket they give you. I instantly thought - "This man needs a quilt."


I gave it to him a few weeks ago. He was sitting up in a wheelchair and he held it on his lap. He silently touched the fabric and looked at the colors. "Thank you. It's beautiful." He got real quiet after that. You're never too old to be comforted by a quilt.
Wednesday, January 30, 2013
Miniature Sweater Ornaments
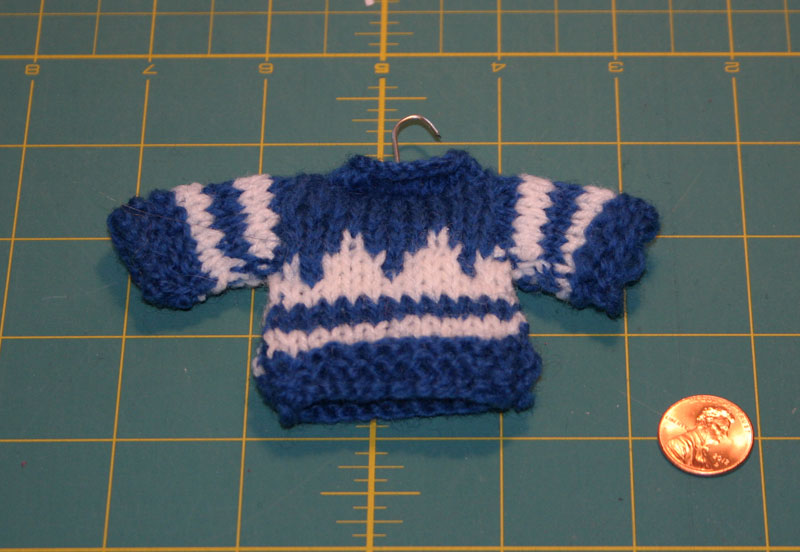
Here's another knitted gift idea I worked on last fall. When I saw these little sweaters I just fell in love with them! I thought they'd make great gifts and it would be a terrific way to practice colorwork.

I used fingering weight yarn remnants, it takes very little to knit one. They're knitted flat then folded in half and stitched. The first one turned out so cute I had to make another!


.jpg)
A few days after I put it on my Ravelry account I got this message from Berroco:
I do social media for Berroco and I’m looking to feature some of our patterns recently completed by Ravelers on our blog. First, is it okay to share your picture(s) on our social media pages? Second, if you’re interested, please answer the following questions...
You can imagine how tickled I was! You can view the Berroco blog post here.
Heart Trivets
I got this idea from a woman in my mini group. What a perfect way to upcycle old wool shirts and worn out blue jeans.

Make a paper pattern that's at least 11" across the widest part, then cut one heart from 100% cotton denim.

Cut two hearts from 100% wool. In the picture above I pieced the wool by butting raw edged together and zig zagging over the join. You don't want spandex in the denim or a wool blend.
Then I strip pieced 1-1/4" and 1-1/2" cotton strips to the two layers of wool. Once it's pieced, I turned the heart wrong side up and trimmed the strips to the heart shape.

Next I added machine embroidery stitches along each seam in contrast colored thread. It was great fun to actually use some of those stitches on my machine! Then put denim right sides together with the pieced heart and sew 1/4" seam all the way around, leaving an opening to turn. Clip the curve and grade the seam allowance. Turn right side out, press and top stitch an 1/8" from the edge.

They were so fun I just kept making 'em!


Subscribe to:
Posts (Atom)