Sunday, May 03, 2015
May BOM
May Block of the Month was Buckeye Beauty.
I had it confused with Jewel Box, which is what you get with four of these set together.
Saturday, May 02, 2015
Denim Car Quilt
I've often said I'm going to make a picnic/car quilt, but then the quilt turns out too nice, and I don't want to put it on the ground. Then I saw this tutorial on my friend's FB page and I decided to make a denim quilt.
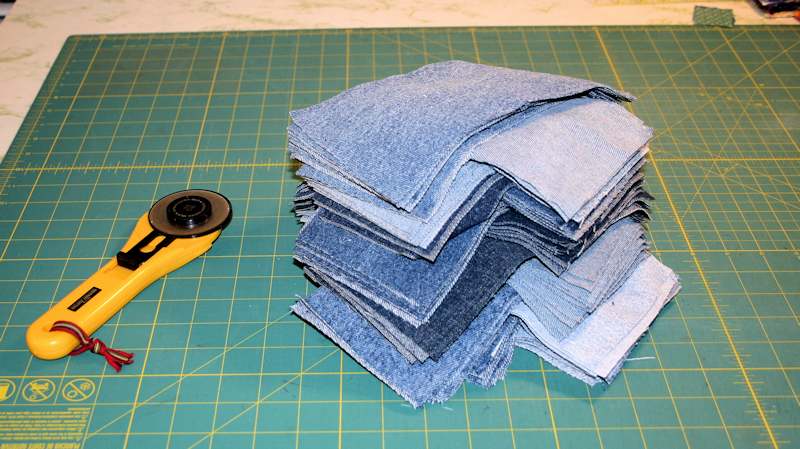
I was able to get a *stack* of large sized men's jeans from the church rummage sale for a song. Here's my little helper photo bombing again.
I cut 120 - 4 1/2" x 8 1/2" rectangles following the grain of the fabric.
I didn't plan it, but I ended up with lots of different shades of blue.
... always has to be right in the middle of things...
I started out on my
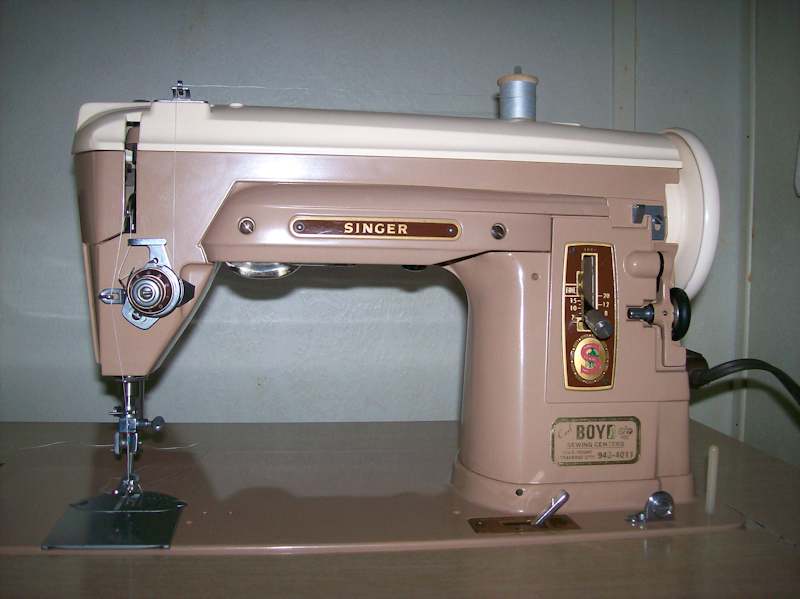
Janome, but four layers of denim was too much for it. I got out my heavy duty Singer
Slant-o-matic and it churned over those seams with ease. The
right tool for the job.
The denim really wanted to fray, so I spent a lot of time reinforcing the seams. I top-stitched all the short seams with white, jeans weight thread and all the long seams with medium gray, all purpose thread.
I also added a few labels from my favorite brands.
I backed it with dress-weight cotton and tacked it from the front at all the intersections with an egg shaped pattern stitch on my Janome. Love it! It's heavy and durable and feels like my favorite pair of blue jeans.
Tuesday, April 28, 2015
Thursday, April 23, 2015
Fresh From the Garden
This morning's harvest; Italian parsley and five types of lettuce. I've been getting about this much every 3-4 days. Green smoothie anyone?
Monday, April 20, 2015
April Quilt
I finished another Continuous Strip quilt. Here are the strip sets. I usually start by pulling 2 1/2" precut strips from the drawer, then if I need to, I cut more from the stash to fill out the color scheme.
The top had sat on the shelf for a couple of years, until it was properly aged.
I also got to practice my free-motion quilting. By the end of the quilting, I had the hang of it.
![]() |
| Click to enlarge |
I didn't attend the event, but I heard it sold. I'm glad I could help out the shelter pets.
Saturday, April 18, 2015
Quilt Label Making
Quilters have asked me how I make my labels. Here's a photo tutorial.
I start by treating a yard of bleached muslin with Bubble Jet Set. This product prepares the fabric to hold ink from a computer printer, similar to preparing fabric to receive dye. By preparing a yard, I always have pre-treated fabric ready for label-making.
I use Illustrator to create the label, but any text and graphic program would work. Try using a word processor and see what you can create.
Next I cut a sheet of freezer paper 8.5 x 11 inches, standard printer paper size, using a rotary cutter I only use on paper. Cutting paper with a rotary cutter usually used on fabric will dull the blade. Then I cut a piece of the treated muslin 8.5 x the width of my label graphic.
With my iron on the cotton setting and working on a firm surface, I fuse the freezer paper to the muslin. It works best if you fuse the paper to the fabric, rather than the fabric to the paper. With the iron on the paper, count slowing to ten, then move to a new spot to fuse. It doesn't matter if you use a steam or dry iron. Creating a tight fuse is critical to successfully printing your label.
My computer printer flips the paper as it pulls it from the paper tray so I place the sheet fabric-side down in the paper tray. You'll need to experiment with paper and printing to discover which way your fabric sheet needs to go into the printer's paper tray.
If the paper-fabric fuse is tight, you'll get a perfect print job. If not, it will jam and create an unusable mess. You usually have to take the back off the printer to remove the jam. Then fuse another sheet of freezer paper to another piece of fabric and try again.
Once printed, peel off the paper backing and set the ink by pressing it with a hot iron. Wash your label in a small basin of warm water, with a splash of vinegar added, to help set the ink. This will help prevent the colors from fading as quickly.
Cut out the label, including a quarter inch seam allowance around your design. Cut the same sized shape from light weight nonfusible interfacing.
Sew the interfacing to the right side of the label using a quarter inch seam. With sharp scissors, cut a small slash and turn the label to the outside. Press.
The label is ready to be hand sewn on the quilt. I use a blind hem stitch, with thread to match the label's fabric.
Huh. I just noticed this label should've read 2015. Even my proof-reader missed it! Oh well, I hope the recipient doesn't mind.
I start by treating a yard of bleached muslin with Bubble Jet Set. This product prepares the fabric to hold ink from a computer printer, similar to preparing fabric to receive dye. By preparing a yard, I always have pre-treated fabric ready for label-making.
I use Illustrator to create the label, but any text and graphic program would work. Try using a word processor and see what you can create.
Next I cut a sheet of freezer paper 8.5 x 11 inches, standard printer paper size, using a rotary cutter I only use on paper. Cutting paper with a rotary cutter usually used on fabric will dull the blade. Then I cut a piece of the treated muslin 8.5 x the width of my label graphic.
With my iron on the cotton setting and working on a firm surface, I fuse the freezer paper to the muslin. It works best if you fuse the paper to the fabric, rather than the fabric to the paper. With the iron on the paper, count slowing to ten, then move to a new spot to fuse. It doesn't matter if you use a steam or dry iron. Creating a tight fuse is critical to successfully printing your label.
My computer printer flips the paper as it pulls it from the paper tray so I place the sheet fabric-side down in the paper tray. You'll need to experiment with paper and printing to discover which way your fabric sheet needs to go into the printer's paper tray.
If the paper-fabric fuse is tight, you'll get a perfect print job. If not, it will jam and create an unusable mess. You usually have to take the back off the printer to remove the jam. Then fuse another sheet of freezer paper to another piece of fabric and try again.
Once printed, peel off the paper backing and set the ink by pressing it with a hot iron. Wash your label in a small basin of warm water, with a splash of vinegar added, to help set the ink. This will help prevent the colors from fading as quickly.
Cut out the label, including a quarter inch seam allowance around your design. Cut the same sized shape from light weight nonfusible interfacing.
Sew the interfacing to the right side of the label using a quarter inch seam. With sharp scissors, cut a small slash and turn the label to the outside. Press.
The label is ready to be hand sewn on the quilt. I use a blind hem stitch, with thread to match the label's fabric.
Huh. I just noticed this label should've read 2015. Even my proof-reader missed it! Oh well, I hope the recipient doesn't mind.
Saturday, April 11, 2015
Shoreline Shawl
I worked along on my top-down shawl most of the winter. Because the yarn was a smaller gauge then the pattern suggested, I did another repeat, which brought the stitch count to 400+.
The lace border was worked on the long edge and cast off one stitch each row. I enjoyed learning this new technique, called an applied border.
But the lace gave me trouble at first, so I decided to work a sample on a larger scale. That helped a lot. I could see what was going on and learned the stitch pattern.
Once it was all done, I soaked it in cool water and pinned it to foam core board.
The lace opened up so nicely! Suddenly I understood why it was called Shoreline. The lace looked like cresting waves.
It's large enough to wear in a number of different ways, which is fun.
Because it's linen and cotton, it's surprisingly light for the amount of fabric there is. The designer asked if I'd be willing to let her use my photo on her Ravelry pattern page. Sure!
Thursday, March 19, 2015
Boyfriend Sweater
Part of the fun of searching for thrifted sweaters to deconstruct and reclaim the yarn from, is finding terrific sweaters that I want to wear.
This boyfriend sweater was .50 at the church rummage sale. It's nearly 100% lamb's wool. My color, my style and one of my favorite fibers. But it was amazingly scratchy for lamb's wool.
Into a cool wash, with a little shampoo, it went.
And it bled red dye like cherry Kool-aid.
When it dried it was like a different sweater; soft and pleasant to the touch. Maybe all that extra dye in the fiber changed the texture of the wool. Now it's one of my favorites; light, yet warm. Perfect.
Monday, March 09, 2015
Frosted Rosebuds FO
My Mom's quilt came back from the long-arm quilter's and I finished the binding shortly thereafter.
I like the three-color theme of this quilt. I'm so used to making multi-fabric quilts with dozens of prints, this one has a subtlety about it.
After I put it in the mail, I called Mom to tell her when to expect it.
We agreed to Skype when she opens it. 3,000 miles apart, but we can share the moment.
Thursday, March 05, 2015
Quick Quilt
My quilt guild makes community quilts to donate to Children's Protection Services and the hospital. They don't have to be elaborate, just something to cheer the recipient.
I pulled these colors from the fabric pile on the Freebee table at guild and finished it in very little time.
I hope it warms a child's heart.
Thursday, February 26, 2015
Card Trick in My Colors
I really liked the new piecing method for this block and decided to make one for myself.
This method creates two set of speed pieced units. The original instructions said to put one set aside and make something else out of them. But with a little careful planning, I reworked the instructions to create two blocks. One block appears to spin clockwise and the other counter clockwise. If I keep the fabrics in the same place in each block, it isn't really obvious.
I like it this size, but it seems to be asking for a dark border to finish it.
Subscribe to:
Posts (Atom)


.jpg)